Introduction
Apps allow extending Antispace functionality with external tools and services. An antispace app consists of 4 main parts:
- Manifest
- Widget UI endpoint
- Page UI endpoint
- Action endpoint
How Apps Work
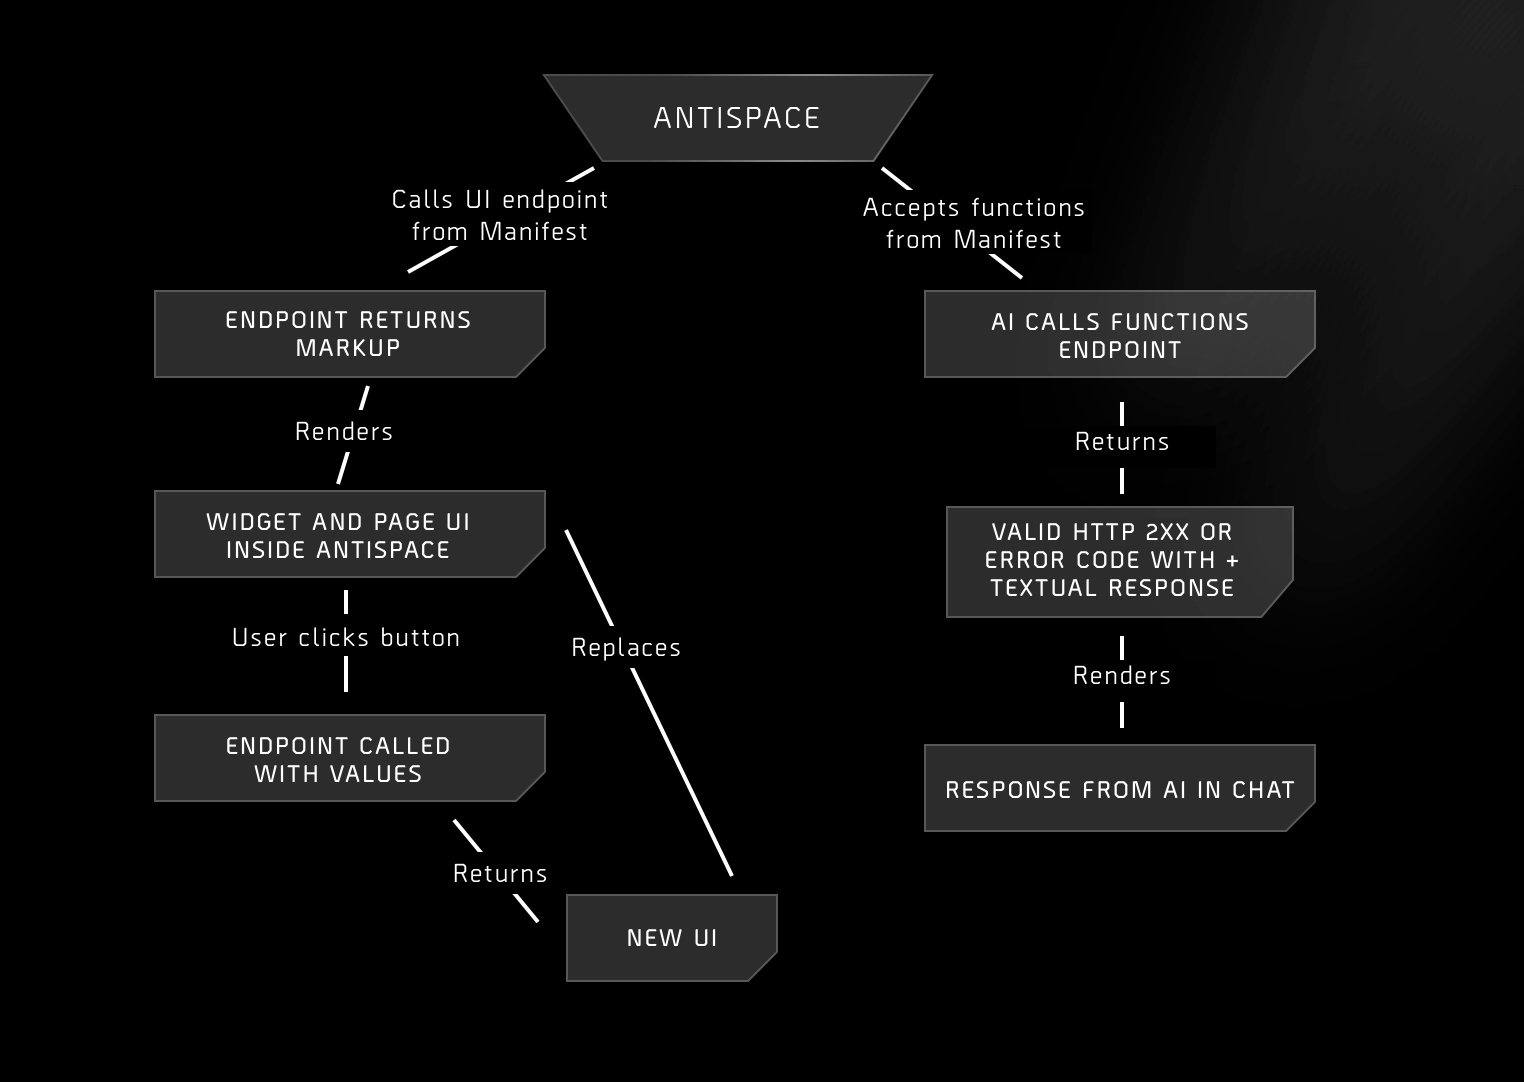
Any Antispace app in it's core is a server application that accepts requests from Antispace and returns a properly formatted response. Apps can be written in any language and do anything a normal server-side application can do.
Antispace provides a set of tools for easy development using JavaScript/TypeScript. Additionally, if you develop your app using Antispace CLI and SDK, you can use the CLI to deploy your app directly to Antispace's high-performance global infrastructure for free.
Let's talk about the different parts of a app:
Manifest
The manifest is a key set of definitions about an Antispace app. It's a JSON file that defines basic information about the app, Antispace features it taps into and AI functions it exposes.
Widget UI Endpoint
The widget UI endpoint returns UI markup to be rendered as a widget on the main Antispace dashboard.
Page UI Endpoint
The page UI endpoint returns UI markup to be rendered as a dedicated page inside the Antispace dashboard.
Action Endpoint
The action endpoint is a server-side endpoint that handles AI actions. It will be called by the Antispace backend when user interacts with the app using AI.
App State
Antispace apps do not maintain any client-side state. For security purposes, apps cannot execute client-side code and don't have access to complete user data. An app's UI is rendered as returned by the UI endpoints and is only updated when new UI is received from the endpoint, either via polling or after a user interaction.
User Data
Apps do not have access to user's personal data, their Antispace account or any of their credentials. The only things a app can access are the data it receives from user interactions and basic profile information, such as user ID, name, character, etc.
See Endpoints for more information.
App Lifecycle
Apps state is derived from user interactions. After the initial render, unless app is configured for polling, the UI will only upate when the user interacts with the app.
Additionally, apps can be interacted with via AI chat. In this case, the app will receive the AI command and should return a text response. The exact content of the response is up to the app as it will be interpreted by the AI when presented to the user.
App UI
The UI for both widget and page is returned from their respective endpoints.
The response from the UI endpoint is a JSX-like string with a specific list of components supported by Antispace. You can find the full list of supported components in the UI Components section.
It's important to note that while it looks like the UI is rendered using React, it is not React or client-side JavaScript. JSX is used by the Antispace SDK to aid in writing UI components, but the return format is a string. It's helpful to think of it as XML rather than JSX.
Example Markup for a Simple Widget
<Column>
  <Text type="heading1">Hello Antispace!</Text>
  <Text>Welcome to your new app.</Text>

  <Divider />

  <Row justify="between">
    <Input name="username" placeholder="@anti" />
    <Button type="primary" size="small">Submit</Button>
  </Row>
</Column>
How you generate the markup string is entirely up to you. You can use any framework you want and any language you want, so long as the endpoint response is a string of a valid format.
For JavaScript, we provide a helper SDK that you can use to render the UI from Express, Next.js or any other server-side framework.
AI Actions
AI actions are a way to expose functionality to the user via AI. They are defined in the functions schema and triggered by the user when they interact with the AI chat.
The function definition is an objet that describes the action and the parameters it accepts.
{
  "type": "function",
  "function": {
    "name": "set_nickname",
    "description": "Set user's nickname",
    "parameters": {
      "type": "object",
      "properties": {
        "nickname": {
          "type": "string",
          "description": "Nickname string"
        }
      },
      "required": ["nickname"]
    }
  }
}
To learn how to build your own integraions, continue to our guide below.